
Eating outside is one of the best parts of the summer. Make serving meals alfresco easy by adding a sturdy, modern picnic table to your backyard that also shows off your DIY skills.
Use this picnic table design and step-by-step guide to build an A-frame table. This project should take around four hours and will leave you with a basic picnic table that will be hearty, yet lightweight enough to move around.
Materials for DIY Picnic Table
For this intermediate DIY project, you will need multiple power tools. If you don’t have the right tools, check with your local hardware store about rentals.
List of Supplies for an A-Frame Picnic Table
Tools
Hardware and Other Supplies
Lumber
Choosing the Best Wood for Your Picnic Table
When choosing the lumber for your picnic table, select a durable, weather-resistant wood. Softwood species like Cedar, Redwood and Douglas fir are all good options that are both weather-resistant and available at most lumber yards. These are the best woods for picnic tables because they are lightweight and extremely tough.
Choosing a hardwood species for this picnic table design will add unnecessary weight.
For the legs, consider purchasing pressure-treated lumber, since the legs will come in contact with the ground. This will make the legs as durable as possible.
Pro Tip: “Use tight-knot cedar decking. Cedar is a great outdoor wood that’s naturally rot-resistant and has a great, warm look and using decking will mean your wood is smooth on all four sides.”
Dunn DIY
How to Build an A-Frame Picnic Table
Now that you have all of your supplies, use these picnic table plans to build a simple, traditional table for your yard.
These picnic table designs are for a 6-foot-long table. If you choose to make a longer table, you will need to adjust some of the measurements.
Step 1: Cut and Sand the Wood
Start your picnic table by cutting pieces to the following measurements.
| Piece | Amount | Length | Materials | |
| A | Legs | 4 | 31 1/4 inches | Two 6-foot-long two-by-six, Pressure Treated Lumber |
| B | Table Cleats | 3 | 26 inches | One 8-foot-long two-by-four, Construction Grade Lumber |
| C | Seat Cleats | 6 | 10 inches | One 8-foot-long two-by-four, Construction Grade Lumber |
| D | Seat Supports | 2 | 61 inches | Two 6-foot-long two-by-six, Construction Grade Lumber |
Cutting Instructions
A: Cut each leg to be 31 1/4-inches long from the pressure-treated lumber. Set the miter saw to 25 degrees and cut the top and bottom of each leg.
B: Cut three cleats for the tabletop using one two-by-four. Each cleat will be 26 inches long. Optional: Using the miter saw, bevel the bottom corner of each cleat so it will hurt less when you bump your knees on them under the table. (See Figure 1.)
C: Cut six 10-inch cleats for the seats using one two-by-four.
D: Cut two seat supports using two of the two-by-sixes. Each seat support will be cut to 61 inches in length.
Set aside one 8-foot-long two-by-four for the table braces, which will be cut later.
After completing each cut, sand each piece to remove any splinters and rough edges.
Pro Tip: “Use a sander to buff out cut edges and remove splinters. The amount of effort you expend here is a question of how smooth you want your table to be. At the very least, you definitely want the end splinters sanded so you’re not injuring people as they sit at your table.”
Dunn DIY
Step 2: Construct the Tabletop
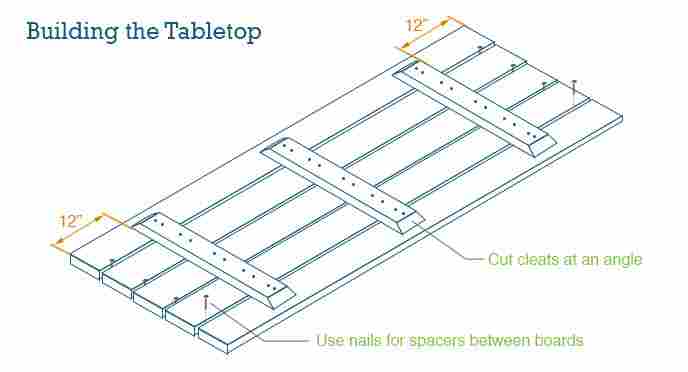
Figure 1: Building the Top of the DIY Picnic Table.
Lay five of the remaining 6-foot-long boards on your work surface. Place the better-looking sides down so you are looking at the underside of the table.
Step 3: Build the Picnic Table Seats
Repeat the process from the tabletop to build the tops of the seats.
Step 4: Create the A-Frame Legs
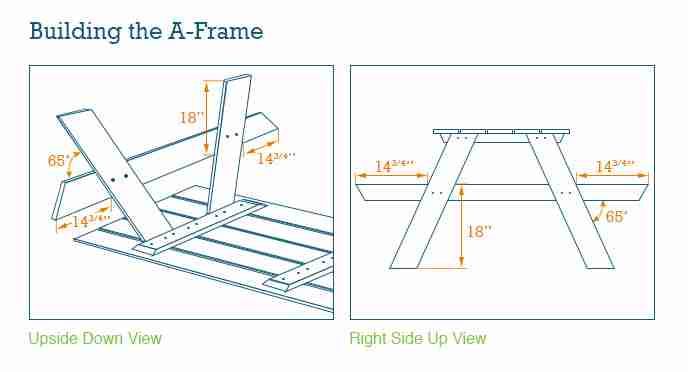
Figure 2: Legs and Seat Support create the A-frame.
Next, build the A-frame of the DIY picnic table which consists of the table legs and the seat supports. For this section you will need the two 61-inch seat supports (D) and the four 31 ¼-inch legs (A).
For the second A-frame, lay materials on top of your first A-frame as a template and then repeat the steps.
Step 5: Attach the Legs to the Tabletop
With your tabletop still upside on your work surface, begin attaching the legs. Using the adhesive and clamps, attach the top of the A-frame to the outside of the side cleat.
Secure the legs with two 4-inch deck screws per leg. Repeat process on the other end of the table.
Step 6: Cut and Install Tabletop Brace
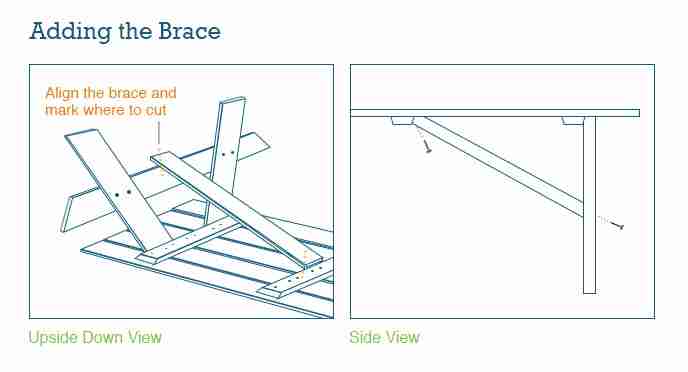
Figure 3: Find the angle and length of your brace.
Using your final two-by-four, it’s time to measure, cut and install the brace between the center of the table and the A-frame legs.
Step 7: Install Carriage Bolts to Further Support Your A-Frame Picnic Table
To add extra support to the seats and A-frame, install carriage bolts where the legs and seat support intersect.
After you’ve installed the carriage bolts, it is time to flip your table over so it is standing on its legs.
Step 8: Attach Seats
Using the last four two-by-six boards, install the seats of your DIY picnic table. Place your seats cleat-side down on the seat supports, making sure the ends are flush with the ends of the tabletop.
Use the 4-inch deck screws to attach the seats to the seat support. Drill into the top of the seats and through the seat supports.
How to Stain Your Picnic Table
Materials for Staining a Picnic Table
Important: If you didn’t sand your boards before building your picnic table, complete this step before you begin staining.
Pro Tip: “If it is pressure treated lumber, you should let it age for about 6 months prior to applying a finish and protective topcoat.”
Jen Newell | Brand Manager, Rust-Oleum
If you would like to change the color of your picnic table you will need to add a wood stain first. If you are just looking to protect your table from deterioration, you can simply add a finishing coat.
Using your paintbrush or roller, apply stain or protective coat on every piece of the DIY picnic table. Use a paintbrush or rag to smooth over any drips. “A synthetic paint brush or simple staining rag will work,” according to Newall.
Let your table dry based on the product instructions and then flip it over on the drop cloth and apply product to the underside of the table. Protecting the underside of the table as well will help you extend the life further.
Apply as many coats as suggested by the product label, following the instructions for wait time between coats. If you chose to stain your table, repeat this process with your protective coating when ready.
Pro Tip: “How often it should be refinished will be dependent on the weather it is exposed to throughout the year. All of [Rust-Oleum’s] spar urethane finishes are tested to endure multiple freeze thaw cycles and should protect your outdoor furniture for multiple years.”
Jen Newell | Brand Manager, Rust-Oleum
Time to Enjoy Your Picnic Table
Now that you have a DIY picnic table for your backyard, you’re ready to host your next barbeque or outdoor dinner party.
Find more ways to improve your backyard with these articles:
Already built your own picnic table? Let us know what design and wood you used in the comments.
Leave a Reply